Follow Me on Pinterest The Cupcake Files: 2012

Thursday, November 29, 2012

The Munchies!

This is the ultimate cupcake!  Rich chocolate cake, creamy peanut butter filling, chocolate cream cheese icing, crushed pretzels and caramel.  One day while eating a bag of chocolate covered pretzels it hit me...This would make an awesome cupcake!  Thus, "The Munchies" cupcake was born.  If ya wanna make some of these addictive confections, the recipe is below.


Chocolate cake

  • 1 1/2 cups unsweetened cocoa powder, highest quality available
  • 1 1/2 teaspoons salt
  • 3 cups all-purpose flour
  • 1 tablespoon baking soda
  • 3/4 cup vegetable oil
  • 1 1/2 cups buttermilk
  • 3 cups sugar
  • 1 1/2 teaspoons vanilla extract
  • 1 1/2 teaspoons baking powder
  • 3 large eggs, lightly beaten
  • 1 1/2 cups hot water
Pre-heat oven to 350 degrees.
Sift together flour, salt, cocoa powder, sugar baking soda and baking powder.
In a seperate bowl mix together, eggs, buttermilk, oil, vanilla.  Add to dry mixture.  
Slowly beat in hot water.  Mix until smooth, will be a thin batter.

Fill cupcake liners 3/4 full.  Bake for 35-40 minutes, just until a cupcake passes the toothpick test.  Makes about 28 cupcakes

 Creamy peanut butter filling
  • 1/2 plus 1 tablespoon creamy peanut butter
  • 1 stick softened unsalted butter
  • 1/3 cup milk or half and half
  • 4-5 cups powdered sugar

Cream butter and peanut butter together add milk and mix until creamy.  Add powdered sugar 1 cup at a time.  You want it nice and creamy, not stiff like a buttercream, so if you need to add more milk, add ONE tablespoon of milk at a time, until it becomes a creamy filling.
Chocolate cream cheese icing

  • 2 sticks softened unsalted butter
  • 8 ounces softened cream cheese
  • 1 1/3 cup cocoa powder
  • 2 tsp vanilla extract
  • 7 cups powdered sugar
  • 1/3 cup whole milk or half and half

Cream the butter and cream cheese together, add vanilla.  Sift in Cocoa powder and milk.  Add powdered sugar 1 cup at a time, while mixing.

Caramel topping
If you don't feel like making your own caramel, you can melt soft caramel candies in a double boiler with some heavy cream, over low heat until it's smooth.  If you wanna try your hand at homemade, follow the recipe below, it's AMAZING!

  • 1/2 cup light-brown sugar
  • 4 tablespoons (1/2 stick) unsalted butter, cut into small pieces
  • 1/4 cup heavy cream
  • 1/2 teaspoon pure vanilla extract
  • Pinch of coarse salt
In a small sauce pan bring butter, sugar and cream to a boil over medium-high heat. Stirring constantly until butter is melted and mixture is smooth. Reduce to a low-heat simmer, simmer for 5 minutes, stirring occasionally.  Stir in vanilla and salt, transfer to a glass jar or heat safe container and allow to cool to room temp.  (if you pour it over the chocolate icing while hot, it will melt the icing and become a giant mess, I learned the hard way.)
 Pretzel topping

Crush pretzel sticks and sprinkle ontop of cupcakes....ENJOY!!!!


***notes*** for the swirl on the cupcakes I used a Wilton 1M tip, you can find these at pretty much any craft store and Walmart even has them.

Wednesday, September 12, 2012

Note paper template for organizational binder

I created a "Notes" template for my organizational binder.  Link below...
https://docs.google.com/document/d/1L5dCZJHwKRRwmc2q2hspxKnrUvE18xiouPuiBU_nTSk/edit

Recipe card for organizational binder

This is a recipe card I created for my organizational binder.  I am going to write some of our go to recipes and recipes that I want to try and add them into my household binder.  Once again it is a google document.  Link for the google doc is below :D

https://docs.google.com/document/d/1Cl_aq9P0g3PvN7QVGn4W9szhXwtXWAWXeD7sXyzH1_4/edit

Thursday, September 6, 2012

Week by week planner for your home organizational binder

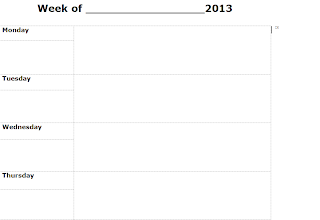
 I also like to have a week by week planner in my binder, where I can get a little more specific about certain appointments, plans and reminders. Pick out and customize your own weekly planner pageshere! <----Once again, you can pick out your own style of weekly planner pages, download and print, you can even customize them. I will include a picture below of the one I like.

This is just a screen capture but you get the idea. I like the more simple, straight forward style planners and this one is perfect.

A month by month calendar for your home organizational binder

Awesome site for printable calendars <----this site has a ton of calendars you can print, a lot of styles to choose from.  I chose a simple one that listed the holidays for each month and a space off to the side for notes.  I will include a picture below.  I use a three hole punch to punch holes in the papers and I put them in my binder.
 

Wednesday, September 5, 2012

Chore Chart

I'm back!  I was MIA for a while, my life has been pretty hectic but now that things are starting to slow down, I am back and have sooooo much to blog about!  During my hiatus I realized I am in need of some serious organization, I have been creating charts and tons of other organizational documents that I am going to be putting in an organizational binder for my household.  The first chart I want to share with you all, is my 9 year old daughter's chore chart.  I made it in google documents, so you can edit it, color code it, add to it any way you'd like.
Chore Chart <------- Go here for the chore chart

Here is a screen capture of the chart


You will notice beside each chore is a monetary value, each day that she does that specific chore, she earns that dollar amount.  At the end the of the week we add up each check mark's dollar amount and that is the allowance she gets for that week.  She doesn't have to do all of these chores each day, I go through and highlight the ones she MUST complete each day (like picking up her room)...If she chooses to go above and beyond and do extra chores, she is then rewarded for that.                      

Thursday, April 5, 2012

Peanut buttercup cake


Chocolate Cake
1 1/2 cups hot coffee
3 Cups Sugar
2 1/2 cups sifted all purpose flour
1 1/2 cups cocoa powder
2 teaspoons baking soda
3/4 teaspoon baking powder
1 1/4 teaspoon salt
3 large eggs (room temperature)
3/4 cup vegetable oil
1 1/2 cups buttermilk (shaken very well)
3/4 teaspoon vanilla
3 ounces of high quality semi-sweet chocolate

Preheat oven to 300 degrees
In a large bowl sift all dry ingredients and sugar together.
in a small bowl pour hot coffee over semi-sweet chocolate, whisk together until chocolate is melted.
in a large bowl beat eggs with an electric mixer for 3 minutes, add oil, vanilla, buttermilk and coffee/chocolate mixture.  Beat on medium for 2 minutes.
Add sifted dry ingredients to wet mixture and beat on medium speed until well combined.
grease 2, 8 inch round cake pans and put a circle of parchment or wax paper in the bottom of each pan.  Pour 3 1/2 cups of batter in each pan (I make cupcakes with the left over batter)
Bake on 300 degrees for 1 hour-1 hour and 5 minutes.  At about the 1 hour mark, check cakes with a toothpick, if tooth pick comes out mostly clean, the cakes are done.
Allow to cool IN the pans.  Take a knife, loosen the cake from the sides of the pans and once totally cooled, you can invert the pans onto wire racks and allow to cool for any additional time.


Peanut butter buttercream
2 sticks  unsalted butter (softened)
6 cups powdered sugar
1/3 cup whole milk
1/3 cup plus 2 tablespoons of peanut butter
1 teaspoon vanilla
beat butter until it is light and fluffy...Add milk and vanilla.  Add powdered sugar 1 cup at a time.  Whip for a few minutes, then add the peanut butter.  Continue to mix for 3 minutes.
Chocolate buttercream frosting
1 stick unsalted butter
2/3 cup Cocoa powder
3-4 cups powdered sugar
1/3 cup milk
1 teaspoon vanilla extract
Cream butter, add milk and vanilla.  Add cocoa powder.  Add powdered sugar 1 cup at time. mix until fluffy.
Chocolate ganache-
4 ounches of dark chocolate
1/2 cup heavy cream
1 teaspoon unsalted butter
Heat together in microwave for about 30-45  seconds.  Whisk together, until all chocolate is melted and ganache is glossy.
Assembly of cake
Put one cake round on serving plate or cake board flat side up.  Top with half of the peanut butter buttercream and chopped Reese's Cups (about 5 Reese's cups) .
Stack the other cake round ontop flat side up.  Frost with chocolate frosting.  Using a pastry bag fitted with the Wilton 1M tip and with peanut butter buttercream in the bag, with a medium pressure squeeze out dollops of the frosting on top of cake and as cake border.
With a whisk, drizzle ganache all over top of cake and on sides.  Cut Reese's Cups in half and place halves on top of cake.

Wednesday, March 28, 2012

Cupcake Bouquet

Perfect for Mother's Day!!!
I used toothpicks to hold the cupcakes onto a Styrofoam ball, inside of a flower pot...then with a medium consistency, crusting buttercream, piped on the flower with Wilton Tips #1M and #2D...I used airbrush to color the flowers.  Picture tutorial to come soon, so check back...If you have any questions, feel free to email me.

Monday, March 5, 2012

Strawberry cupcakes with vanilla buttercream

1/3 cup strawberry pure
1 1/2 cups cake flour , sifted
1 tsp. baking powder
1/4 tsp salt
1/4 cup whole milk , room temperature
1 tsp. pure vanilla extract
1 stick unsalted butter , room temperature
1 cup sugar
1 large egg
2 large egg whites
Preheat oven to 350°.
In a bowl, sift together flour, baking powder and salt; set aside.
In another bowl cream together, sugar and butter, until light and fluffy  Add in egg and egg whites, milk, vanilla and strawberry puree
With your mixer on low, add the flour mixture slowly into the wet ingredients.  Mix just until combined.  Pour into lined muffin cups and bake for 19-22 minutes, or until toothpick inserted comes out clean.

Vanilla buttercream
2 sticks unsalted butter (softened)
1 1/2 teaspoons vanilla extract
1/4  tsp salt
2 pounds powdered sugar
6 tablespoons whole milk

Cream butter until it is light and fluffy, add vanilla extract, salt and milk.  Mix together until well blended.  Add powdered sugar 1 cup at a time, until you reach desired consistency.

Friday, February 24, 2012

Pumpkin spice cupcakes with cinnamon cream cheese icing and caramel

2 cups sifted all purpose flour
2 teaspoons baking powder
1 teaspoon baking soda
2 teaspoons cinnamon
1 teaspoon ground ginger
1 teaspoon nutmeg
1 cup granulated sugar
1 cup light brown sugar (packed)
1/2 tsp salt
4 eggs
1 cup vegetable oil
2 cups pumpkin puree (not pumpkin pie filling)

Preheat oven to 350 degrees.
In a bowl mix both cups of sugar, oil, pumpkin, eggs, salt, spices, baking soda and baking powder.  Slowly add in the flour.  Mix for 2 minutes.

Line muffin pan with cupcake liners, fill each cup 2/3 full.  Bake for 22-25 minutes.  Until toothpick inserted comes out clean.

***These cupcakes are also super yummy if you add 1 cup of semi-sweet chocolate chips**

Cinnamon cream cheese frosting

16 ounces cream cheese, softened
2 sticks unsalted butter, softened
5-6 cups powdered sugar
2.5 teaspoons cinnamon
2 teaspoons vanilla

cream together cream cheese and butter until fluffy.  Add in cinnamon and vanilla.  Mix until well incorporated.  Add powdered sugar 1 cup at a time.

Pipe onto cupcakes and drizzle with caramel.


Thursday, February 23, 2012

Chicken fajita penne pasta

 This is delicious and the best of both worlds.  I love fajitas and I love pasta, so I combined the two and this is what I came up with!  I hope you try it and love it as much as I do.  Enjoy!

1 box of penne pasta
1 cup sun dried tomatoes, chopped
1.5 packets of fajita seasonings (or taco seasoning)
1 8 ounce block cream cheese
1/2 cup sour cream
1/2 cup Monterrey jack cheese
2 cloves garlic, minced
1/2 cup chopped onion
1 green, 1 orange pepper, chopped
1 can diced green chiles
1 cup pasta water
1 pound boneless, skinless chicken breasts cut into strips (can also use streak or shrimp)
4 tablespoons olive oil
4 tablespoons chopped cilantro

Once pasta is cooked, reserve 1 cup of pasta water, set aside.  In a large skillet, heat 2 table spoons of olive oil and cook chicken, steak or shrimp. Remove from pan and set aside.  In the same pan add 2 table spoons of olive oil and add onions, tomatoes, garlic, green chiles, and peppers, saute on medium heat for 4 minutes or until veggies are cooked.  Add 1 cup of pasta water and fajita seasonings.  Stir well.  Add cream cheese. cook for 3 minutes stirring to break up cream cheese, if you need to add a little more water you can do so.
add sour cream and stir.  Add in pasta and meat and toss until pasta and chicken are coated with the sauce.  Add in Monterrey Jack Cheese and cilantro, give one last toss.

I like to set all kinds of toppings out when I serve this, so people can "build" their own pastas.  Some things I will set out...
sliced black olives
diced tomatoes
Jalapenos
Shredded cheeses
Sour Cream
crushed tortilla chips
Salsa
Extra chopped cilantro

Sunday, February 12, 2012

Cupcake decorating part #5


These are cupcakes that I made for my cousin's bridal shower.  The butterflies were made from gumpaste and dusted with edible petal dusts.  The butterflies were cut out using a PME plunger (I will post a picture below).  I love making these butterflies, you can paint them any color you want with petal and luster dusts and they turn out beautiful.  They are so easy and fun.  The little flowers were made the same way, with a PME plunger and dusted with petal dusts, I will post a picture of that plunger below as well!
This is the PME butterfly plunger.  It comes in 3 different sizes, this is the largest size.  The smallest is sooooo cute for making tiny butterflies on mini cupcakes.

This is the PME flower plunger and it also comes in 3 sizes, this is the largest.  

Tuesday, February 7, 2012

Easy cupcake decorating part 4

Classic icing swirl with a #1M tip by Wilton.  Starting on the outer most edge of the cupcake, swirl in clockwise motion while building the icing up.
In part 4 I will be showing you some easy decorating tips using the Wilton #1M tip, this is the most common tip you will see used to create those signature icing swirls on cupcakes.
Create roses with a 1M tip for a cupcake bouquet.  Start in the center of the cupcake and work your way out in a clockwise motion.

Easy cupcake decorating part 3

It's SO easy to make cupcakes look fancy, to make it look like you worked sooooo hard on making them look fabulous.  Below you will find some decorating tips to use to take your cupcakes to the next level...

First up, decorating cupcakes with a Wilton #2D tip.
To get this ruffle look, as your are swirling clockwise and up, shake your hand gently, it will create beautiful ruffles on your cupcake.

With a medium pressure squeeze your pastry bag, then lift.  Do this over and over until the cupcake is covered.  It will create a hydrangea type flower.

Monday, February 6, 2012

Mint chocolate chip cupcakes

In my house mint chocolate chip ice cream is a favorite...Well, I of course had to make a cupcake version and make it I did. Whenever I make these, they are gone within a day! 
Use my chocolate cake recipe and buttercream recipe, adding 1/2 teaspoons of peppermint extract and 1-2 drops of leaf green gel food coloring to the buttercream.  Use a Wilton #1M tip for the icing swirl and sprinkle with semi-sweet chocolate chips!  YUM!

Sunday, February 5, 2012

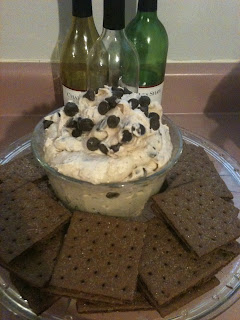
Chocolate chip cookie dough dip! Major noms!


I've seen this recipe all over the place but I made some changes to it to make it even yummier!

8 ounces cream cheese, softened
1 stick of unsalted butter, softened
1/2 cup semi-sweet chocolate chips
1/2 cup milk chocolate chips
3 Heath candy bars, chopped
2 tsp vanilla
1 1/4 cup powdered sugar
3 TBSP brown sugar

Cream together butter and cream cheese, add chocolate chips and chopped heath bars, and 2 tsp of vanilla, cream together.  Add brown sugar and powdered sugar, mix until well combined.
Serve with chocolate graham crackers, cinnamon sugar graham crackers, Nilla Wafers and apple wedges.

There are a million different variations you could try...Add a 1/2 cup peanut butter and some chopped Reese's Cups...Add 1/4 coconut and chopped Mounds bars, chopped almonds!  Make your own creation and let me know how it is!!

Wednesday, February 1, 2012

Easy and quick cupcake decorating #2

 This is a very easy way to decorate holiday cupcakes.  Everyone will love these, you will get tons of compliments and everyone will want to know how you did it!  Kids love them, they're festive and you will end up feeling like Martha Stewart...That's a very rewarding feeling, haha!

What you need (tips, bags, gel color, luster dusts, gumpaste and star cutter can be found at Hobby Lobby and Michael's)
2 pastry bags (I like 20 inch disposable bags)
Wilton 1M tip
Large open star tip (Wilton #199 will work, Ateco also makes one you may also see it called a "French tip")
Green tinted buttercream
Blue tinted buttercream
Gumpaste or fondant
yellow food coloring gel
Gold and silver luster dusts
PME SnowFlake plunger
Wilton fondant star cutter (medium size out of the set of 3)
small paint brush
Colored round sprinkles

First you will want to tint some of your gumpaste yellow.  Put some cornstarch down on a clean flat surface and roll out the yellow gumpaste or fondant.  Cut out stars, lay flat and allow to dry.  If you used gumpaste they will be dry within an hour, if you used fondant allow them to dry overnight.

With the white gumpaste, roll out the same way as the yellow. Once you roll the gumpaste out, allow it to lay out for about 15 minutes.  Because the PME plunger is so detailed, you will need for the gumpaste to dry a little bit.  Dip your PME cutter in cornstartch, once the gumpaste is ready, push the snowflake cutter into the gumpaste, pressing down and pushing the plunger.  Pick the cutter up, hit the release and allow snowflake to dry on a flat surface.
Brush the gold luster dust all over the stars and brush the silver luster dust all over the snowflakes.  (A little goes a LONG way with luster dust.)  Set aside.

Once you have your pastry bags fitted with the decorator tips and filled with the icing (The bag with the 1M tip gets the green icing and the French tip gets the blue icing), you can begin to decorate.

For the Christmas trees
With the 1M tip, to create the tree look, with a medium pressure holding the tip above the cupcake, start on the outside and swirl your way in and up, I like to go in a counter clockwise motion.  You just made a tree, yay!  If you didn't quite get it the first time, it's ok...Just scrape the icing off, into a bowl and try again.
Sprinkle your tree with some colored round sprinkles, to mimic lights and top with a sparkly gumpaste star.

For the snowflakes
With the open star/french tip fitted bag with the blue buttercream, you want to start on the outside of the cupcake and work your way in but not up.  Place a sparkly snowflake in the middle and you're finished! 

Easy and quick cake decorating

The next few days I am going to post easy and quick ways to decorate a cake or cupcakes.  I will also include some quick fondant/gumpaste decorations! This is my first post in that series, I hope you enjoy it!

This is an 8inch double layer lemon cake with a strawberry cream cheese filling.  I will post the recipe soon.

Once your cake is baked and completely cooled, go ahead and level it, fill it and put a nice crumb coat on it. *TIP** to keep my cake board from sliding around as I ice a cake, I take a small square of non slip shelf liner and slip it under the cake board*


In a 20 inch pastry bag fitted with a Wilton #21 tip, fill with your buttercream icing that you have colored with gel food coloring.
 Starting at the bottom of your cake and working your way around, create a swirling motion with the piping bag.  Start in the center and swirl your way out.  You may want to practice on a plate a few times until you get the hang of it.
Decorating this cake took me about 15 minutes once I had the crumb coat finished.  If you plan on taking this cake somewhere, I suggest freezing if for 30-45 minutes, to allow the icing to hardened so it doesn't smear or smudge during transport.

Friday, January 27, 2012

Grape Kool-Aid Explosion Cupcakes

About 10 years ago Dairy Queen had a blizzard that was called a grape kool-aid explosion.  It was vanilla ice cream mixed with grape koolaid and grape poprocks.  DQ offered it for ONE season and then never offered it again :o(  It was AMAZING...So these cupcakes are my take on that blizzard.  For the recipe venture over to the "sweet recipes" tab.

Wednesday, January 25, 2012

Dinner 1/25/2012-White Chili

White chili with smoked paprika garlic bread.  Want the recipe?  Check under the "savory recipes" tab.

Monday, January 23, 2012

Dinner 1/23/2012

Roasted pork loin...Once finished, slice and spoon white wine reduction over, for the recipe look under "savory recipes" tab.

Sunday, January 22, 2012

Cinnamon rolls...In your waffle maker!

 Cinnamon rolls seem like they take FOREVER to bake, not anymore.  It takes 1-2 minutes to make them in your waffle maker!!

What you need:
1 can of cinnamon rolls
waffle maker

Open up the can of cinnamon rolls and place on in each section of your waffle maker.  Close and lock the waffle maker, in 1-2 minutes you have cinnamon rolls.  When they are finished, drizzle with the icing the cinnamon rolls came with.  If you like caramel, you can use premade caramel cake icing (delicious).  Put the icing in a bowl and microwave for 15 seconds then drizzle over your cinnamon roll waffles!  Your kids will LOVE these.  They are quick, easy and delicious.  These are also great for a dessert, with ice cream on top.  Enjoy!

Beach themed cupcakes

 These are vanilla cupcakes with vanilla buttercream icing.  Check out recipes for both the cake and icing under the "sweet recipes" tab.

I used Americolor good coloring gel to color the icing, then I used a round decorator tip to pipe it on.

For the sand, I used graham cracker crumbs and a little brown sugar mixed together and sprinkled on the icing.

The shells and starfish are made from white chocolate.  I melted down a bag of white chocolate chips in a microwave safe bowl, then poured the chocolate into a plastic mold.  Put the mold in the freezer for 10 minutes then removed the starfish and shells from the mold.

To get the color on the shells and starfish, I used petal and luster dust.  This can be found in any cake supply store.  I picked out colors that I thought would make the shells and starfish look realistic.  Brush the petal and luster dust on with a small paint brush.  Set on the cupcake and you're done!  These look really complicated but are SUPER easy, anyone can do it!

The chocolate molds can also be found at your local cake and candy supply store.  If you are having trouble finding them, send me an email and I can pick some up at my local store and will be happy to sell them to you.  They are $2.50 each.

Make your own cake mixes!

I love baking from scratch, almost all of my cakes are from scratch...However, the convenience of a box mix is hard to turn down.  So, I've started making my own "from scratch" cake mixes that I have on hand at all times.  Basically, it's all the dry cake ingredients, sifted together, put into a gallon sized freezer bag, with a label that states what cake the mix will make and lists the measurements of the wet ingredients that need to be added. 

I bake A LOT, I have a few cakes and several dozen cupcake orders each week.  So every Sunday night when I have some free time, I make up these cake mixes so when it comes time to bake all I have to do is dump the mix in a bowl, add the wet ingredients and bake.

Wednesday, January 18, 2012

Make and design your own tile coasters!

For step by step directions and materials needed look under the "Crafts" tab.  These coasters are unbelievably easy to make and a lot of fun!  They also make great gifts!!

Tuesday, January 17, 2012

Snowball cupcake

Classic snowball cupcake, check out the recipe under the "sweet recipes" tab.

'Smores cupcake!!!! Yummy!

If you want to create this confectionery masterpiece check out the recipe and directions under the "sweet recipes" tab.  Don't forget to join my blog so you can get in on the giveaway I have going on!!  Thanks for looking!

Monday, January 16, 2012

Check out step by step directions under the randomness tab

Wanna give this look a try, check out step by step directions under the randomness tab.

Dinner 1/16/2012

Louisiana Sirloin with a blackened creole butter, roasted garlic rosemary red potatoes and steamed broccoli.
For the recipe check out the "savory recipes" tab.

Sunday, January 15, 2012

New look plus check out my giveaway!

Check out what I used and how I used it to get this look, under the "randomness" tab...Also, don't forget to check out my giveaway that I have going on...You could win free MAC makeup just by following and joining my blog!

GIVEAWAY!!!!!!

When I reach 100 followers I want to do 2 giveaways, each with a prize.

The first giveaway will be a makeup contest.  Send me a photo of yourself showing off your makeup skills, and with a list of products used...In the photo you will need to hold a piece of paper with the date and your first name/screen name on it.  I will post the winners picture! 
The prize for this giveaway will be your choice of 2 MAC eye shadows.

The second giveway will be for my bakers!  Send me a photo of a cake or cupcake creation that you are proud of.  Include the recipe used...In the photo please include a piece of paper with the date and your name.  The prize for this contest will be 4 decorating tips, ten 20 inch disposable decorating bags, assorted sprinkles, cupcake papers and 3 americolor food coloring gels.

A random winner for each giveaway will be chosen when the giveaway closes.

The contest will start the day I get 100 followers and will close 2 weeks after that day.   When the contest starts, I will give an email address where all pictures can be sent.

I can't wait to see what everyone comes up with!!!

Make your own doughnuts

 It's super easy and your kids will have tons of fun creating their own.

What you will need:
1 can of biscuit dough (not the flaky kind)
vegetable oil for frying in a skillet
biscuit cutters (or round cookie cutters smallest size)
Chocolate for melting
powdered sugar
cinnamon
granulated sugar
Sprinkles 

Slightly flatten each biscuit then with a small cookie cutter (I used the cap to the bottle of oil, lol) cut a hole in the middle of each biscuit...Don't toss those holes, fry those last for doughnut holes!
Heat your oil on medium, drop each doughnut in, fry for about 30 seconds on each side (until each side is golden brown, watch out, they fry VERY quickly and burn easily)
Lay then on a paper towel lined plate.

Glaze 
1/3 cup butter (melted)
 2 cups powdered sugar
1 1/2 teaspoons vanilla
4 -6 tablespoons hot water
Mix together in a mixing bowl and dip tops and bottoms of doughnuts.
Chocolate icing
6 ounces semisweet chocolate
1 tablespoon heavy cream
2 tablespoons butter
Melt together and stir.  Dip tops of doughnuts in.

Mix 2 cups of powdered sugar and 2 tablespoons of cinnamon in a paper lunch bag, brush doughnuts with melted butter...Put doughnut in paper bag and shake.


Saturday, January 14, 2012

Homemade butter


This is fun for kiddos to do as well, they will love making their own herb combinations.

You will need:
heavy cream
Mason jars
a few glass marbles (optional)
your choice of herbs (optional)

Fill each mason jar half way with heavy cream and drop 2 marbles in each jar (if you don't have the marbles that's ok, just shake a little longer).  Shake vigorously for 10-12 minutes  
The cream will go through several stages...Whipped cream, stiff whipped cream, then the liquid will desperate from the butter (buttermilk, ha!).  Once the liquid has separated shake for 2 more minutes.  Open the jar and pour the liquid out and add 3 tablespoons of ice water.  Shake for 30 seconds.  Repeat this, with the cold water 2 more times. 
Drain all the liquid from the jar and put your butter in a bowl.  You can add your own herbs in.  I like adding in roasted garlic and chopped rosemary.
With a fork combine the herbs.  You can either return your butter to a jar or put your butter on wax paper and roll up and refrigerate.  

I use homemade butter for everything!  It's great alone on a slice of bread...The herbed butters are great for making garlic bread and mixing it in with some pasta, for a quick lunch...and I love using unsalted homemade butter for buttercream icing.

Blueberry streusel muffins

Blueberry streusel muffins.  Check under the "Sweet recipes" tab for the recipe!

Dinner 1/14/2012

Chicken salad on croissants
If you'd like the recipe, check it out under the "Savory recipes" tab.

Thursday, January 12, 2012

Dinner 1/12/2012

King ranch chicken and individual pineapple upside down cakes...Yum!
If you want the recipe for the king ranch chicken, look under the "savory recipes" tab, If you want the recipe for the pineapple upside down cakes, look under the "sweet recipes" tab.


Wednesday, January 11, 2012

Dinner 1/11/2012

Creamy chicken and artichoke pasta!
For ingredients and directions check out the recipe under the "savory recipes" tab.

Check out the Randomness tab!!

Be sure to check out the randomness tab, I will be posting all things random there!  Including makeup and hair tips and makeup looks!

Hi!

Welcome to my blog!  It is still very much a work in progress but I will be updating and working on it daily, so please check back!  Check out my "about me" to read a little bit about me and what this blog will be about!